UV DTF Transfer represents a modern option for garment decoration, delivering crisp detail and durable prints on fabrics. As a bridge between traditional DTF printing and UV-curable inks, UV DTF printing combines color richness with rapid curing that reduces smudges during handling. This quick DTF transfer guide introduces UV DTF Transfer and outlines practical steps for planning, printing, and applying designs. If you’re wondering how to apply DTF transfer, this guide covers typical heat, time, and peel methods to produce clean edges. With a focus on durability, you’ll learn tips for achieving durable prints on fabrics that withstand washes and wear, including UV DTF transfers.
In alternative terminology, this technology can be described as a photopolymer ink transfer applied to textiles using a film-based process. The method uses UV-curable inks embedded in a transfer film, then a heat press adheres the image to the fabric, delivering sharp results. LSI-friendly phrasing includes terms like UV-curable print on fabric, digital textile transfer, and heat-activated graphics that stay vibrant after multiple washes. By framing the concept with related ideas such as substrate compatibility, color fidelity, and cure-on-demand, readers can connect to tutorials and product guides without relying on a single brand name.
UV DTF Transfer: What It Is and Why It Excels in Garment Decoration
UV DTF Transfer combines UV-curable inks with the direct-to-film workflow, producing transfers that cure instantly under UV light. In UV DTF printing, the inks set quickly, improving color stability and reducing smudging during handling.
When the transfer is applied to fabric, the ink becomes part of the surface, yielding crisp edges and excellent wash-fastness. Designers often describe UV DTF transfers as offering high color accuracy and a smooth hand feel, making it a strong option for fine lines, small text, and photographic detail.
UV DTF Printing vs Other Methods: Color, Crispness, and Durability
Compared with traditional DTF transfers and screen printing, UV DTF printing can deliver brighter color on white and light fabrics and, with a white backing layer, also perform on darker textiles. The UV curing process can reduce edge bleed and provide sharper detail, especially in high-contrast designs.
The curing step minimizes smudging during handling and enables faster turnarounds, which is appealing to hobbyists and small businesses seeking efficient production. UV DTF transfers expand the range of printable fabrics while maintaining a favorable cost profile for short runs.
Materials, Tools, and Setup for Consistent UV DTF Transfers
Key materials include UV DTF film designed for UV-curable inks, UV-curable inks compatible with your printer, a printer capable of UV or configured for UV inks, double-sided transfer media, a heat press with adjustable temperature and pressure, weights or clamps for even contact, and optional protective coatings.
Quality and testing matter; test on cottons, poly-blends, and dark fabrics to understand how fabrics interact with UV DTF transfers, and verify ink adhesion and color performance on each substrate. Proper setup helps ensure durable prints on fabrics and minimizes surprises during production.
Artwork Preparation for UV DTF: Part of Your DTF Transfer Guide
Artwork preparation is the backbone of a sharp UV DTF print; plan for at least 300 dpi at the final print size, manage color in CMYK or a UV-specific color profile, and pre-plan a white backing for dark fabrics to ensure legibility.
Use vector graphics for logos and type to preserve sharpness, and ensure bleed and safe margins around important details. Soft-proofing and color calibration anticipate shifts after curing, making this step an essential part of any DTF transfer guide.
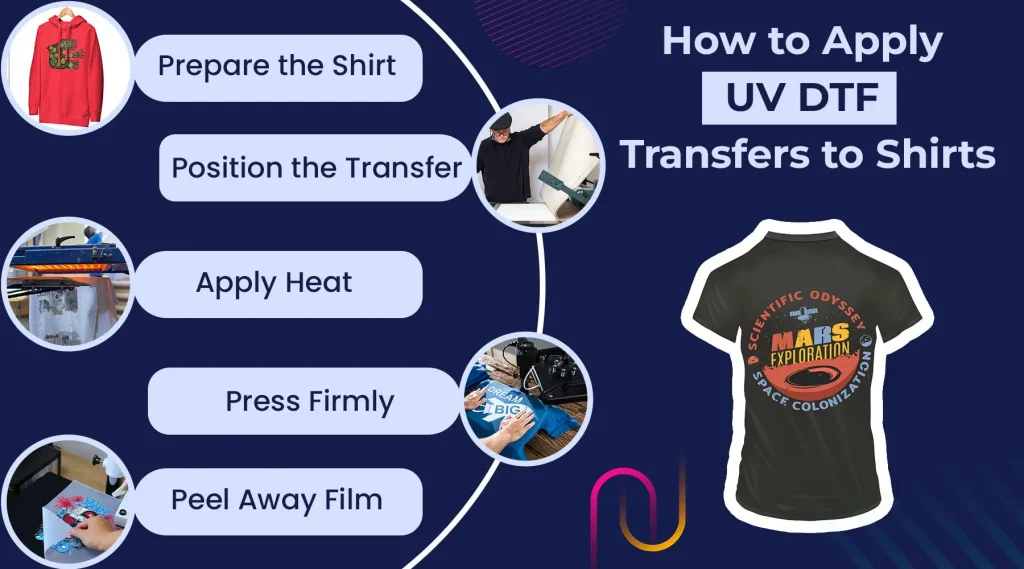
How to Apply DTF Transfer: A Practical Step-by-Step Guide
How to apply DTF Transfer involves pre-pressing the garment to remove moisture and wrinkles, aligning the transfer correctly, and setting the heat press to around 160-170°C (320-338°F) for 15-20 seconds with medium to firm pressure.
Follow the recommended peel method (hot or cold) and perform a brief post-press to set the image. This practical workflow is central to achieving clean edges and durable prints on fabrics, and it aligns with best practices in the UV DTF workflow.
Durability, Care, and Troubleshooting UV DTF Transfers
Durability comes from proper curing and careful pressing. To maximize longevity, turn garments inside out before washing, use mild detergents, and air-dry; if machine drying, keep heat low to protect the transferable layer.
If you encounter cracking, color fading, or halos, revisit curing times, heat/pressure settings, and masking. These troubleshooting steps are a normal part of maintaining UV DTF transfers and ensuring durable prints on fabrics.
Frequently Asked Questions
What is UV DTF Transfer and how does it fit into a DTF transfer guide?
UV DTF Transfer prints designs on a transfer sheet using UV-curable inks in a DTF workflow, then transfers the image to fabric with heat and pressure. The UV cure provides color stability and sharp edges, making it a common topic in the DTF transfer guide for achieving durable prints on fabrics.
Why should I choose UV DTF printing for durable prints on fabrics?
UV DTF printing delivers bright color on light and dark fabrics, with instant curing that reduces smudging during handling. For durable prints on fabrics, it offers strong adhesion, good wash-fastness, and a flexible hand compared with some traditional methods.
What materials and setup are required for UV DTF transfers?
Key components include UV DTF film designed for UV inks, UV-curable inks compatible with your printer, a printer able to handle UV inks, double-sided transfer media, and a heat press or conveyor dryer. A solid setup aligns with any recommended UV DTF workflow in your DTF transfer guide.
What is the recommended workflow for applying the UV DTF transfer to fabric?
Pre-press the garment, align the transfer, and press at about 160-170°C (320-338°F) with medium to firm pressure for 15-20 seconds. Peel hot or cold as directed, then perform a post-press to set the print; this mirrors guidance in the How to apply DTF transfer section of the guide.
What are common issues with UV DTF transfers and how can I troubleshoot them?
Cracking, peeling, or color shifts usually signal insufficient curing or incorrect heat/pressure. Recheck curing times, adjust press settings, and verify color management and masking to prevent halos. Regular small tests can help identify issues early.
How should I care for UV DTF transfers to maximize durability?
Turn garments inside out before washing, use mild detergents, and avoid fabric softeners. Air-dry when possible and re-press if edges show wear; with proper care, UV DTF transfers provide durable prints on fabrics.
| Section | Key Points | Notes/Benefits |
|---|---|---|
| Introduction | UV DTF Transfer blends the flexibility and color richness of traditional DTF with the stability of UV-curable inks; aims for crisp, durable prints; beginner-friendly workflow to plan, print, and apply. | Sets the stage for using UV DTF in a practical, accessible way for new users. |
| What is UV DTF Transfer? | Printing on transfer sheets with UV-curable inks via a DTF workflow; UV inks cure instantly; results include a crisp image, good wash-fastness, and high color accuracy. | Explains core technology and benefits of UV-curable inks in DTF transfers. |
| Why Choose UV DTF Printing? | Advantages include brilliant color on white/light fabrics and on dark fabrics with a white backing; curing reduces smudging/bleeding; enables smaller runs without traditional setup; faster turnarounds; supports cotton blends and performance fabrics. | Highlights practical benefits for production flexibility and material compatibility. |
| Materials, Tools, and Setup | Key items: UV DTF film/substrate; UV-curable inks; printer capable of UV DTF; double-sided transfer media; heat press; weights/clamps; optional top coat/laminate. Test fabrics to ensure compatibility. | Outlines essential gear and a reminder to test fabrics for best results. |
| Artwork Preparation | Aim for at least 300 dpi at final print size; manage color in CMYK or UV-specific profiles; plan white backing for dark fabrics; prefer vector for logos; include bleed and safe margins. | Emphasizes preparation steps that affect final print sharpness and color accuracy. |
| Printing and Curing | Workflow: prepare printer/media, print with UV inks, immediately cure with UV light; consider mirroring if required. | Describes the sequence to fix color and prevent smudges. |
| Applying the UV DTF Transfer | Pre-press garment; align transfer; press at 160-170°C for 15-20 seconds with medium to firm pressure; choose hot or cold peel; post-press to finalize; follow media guidelines. | Gives practical steps to ensure adhesion and finish quality. |
| Durability, Care, and Long-Term Performance | Durability: properly cured inks and well-applied transfers resist cracking, peeling, and fading; care: turn garments inside out, mild detergents, air-dry, low heat if machine-dried; inspect edges and re-press if wear. | Provides guidance to maximize longevity of the print. |
| Troubleshooting Common Issues | Cracking/peeling from insufficient curing or heat; faded colors; bleed/halo around edges; silky/stiff feel from excess adhesive; fixes: adjust curing, color profiles, masking, sharpness, and pressure. | Offers quick remedies to common problems during production. |
| UV DTF Transfer vs Other Methods | Comparison: UV DTF yields higher color fidelity and crispness for small text and detail; traditional DTF offers strong adhesion across fabrics; screen printing is cost-efficient for large runs but different texture/hand. | Helps readers choose the right method based on project needs. |
| Practical Tips for Better Results | Do test prints; maintain equipment; organize color profiles; document press temps/times/materials for future projects. | Encourages good habits to improve consistency and quality. |
Summary
UV DTF Transfer represents a compelling option for creators who want crisp images and durable prints without the heavy setup costs of traditional screen printing. This approach blends the color richness and flexibility of DTF with the immediate cure and stability of UV inks, producing sharp edges, strong wash-fastness, and a smooth transfer feel across a broad fabric range. By following proper file preparation, material selection, and a consistent transfer workflow, printers—beginners and seasoned alike—can achieve professional results with controlled color, detail, and longevity. The method supports small runs, diverse fabrics, and rapid turnaround, making UV DTF Transfer a practical evolution of garment decoration. As you gain experience, you can refine color management and press parameters to maximize durability, edge sharpness, and overall print quality, turning UV DTF Transfer into a reliable staple in your design-to-garment workflow.