UV DTF transfer is changing the game for crafters who want bright, durable graphics on fabrics without the fuss of traditional screen printing, delivering crisp color, excellent fabric compatibility across cotton, polyester, and blends, faster setup, and a workflow that scales from simple keepsakes to small-batch orders. For those exploring direct-to-film printing, this guide shows how UV DTF transfer fits into the broader workflow and why it matters to printing enthusiasts by outlining practical considerations for printer choices, film types, powder options, and steps you can follow with confidence. The approach also emphasizes the dtf transfer process, detailing how to plan designs, print on film, apply adhesive powder, cure the powder, and press with consistent pressure and time, all while adapting to fabric weight, color density, and edge sharpness to ensure professional results. Whether you’re decorating cotton tees, performance wear, tote bags, or blends, the guide highlights how UV-curing decisions, ink choices, and heat-press settings come together to create vibrant prints that endure through regular washing. If you’re new to this method, you’ll appreciate the practical workflow, common-sense troubleshooting, care guidelines, and a flexible path that lets you experiment with direct-to-film transfer while staying within a reasonable budget and a manageable learning curve.
Think of this technique as a film-based, inkjet-driven route to garment graphics, where designs are printed onto a transparent or translucent film, bonded with an adhesive layer, and then heat-pressed onto fabric for a durable finish. In LSI terms, this encompasses related concepts such as digital textile transfer, film transfer, and pigment-ink overprints that share similar workflows and material considerations. Compared to traditional screen printing, this approach offers flexibility, faster turnarounds, and the ability to produce custom-on-demand items with less setup. By framing the topic with these related terms, readers can discover compatible equipment, surface choices, and care practices that support long-lasting wear.
Direct-to-Film Printing for Beginners: Getting Started with a Simple, Vibrant Workflow
Direct-to-film printing offers a practical entry point for crafters and small businesses aiming for bright, durable apparel. It fits well with a beginner’s path because the workflow centers on printing on a transfer film, applying adhesive powder, and then using a heat press to move the design onto fabric. For those exploring DTF printing for beginners, the emphasis is on building foundational skills with reliable, approachable equipment and materials, while gradually expanding your toolkit as confidence grows.
Starting with direct-to-film printing means focusing on a few core elements: a dependable printer capable of printing onto PET film, suitable DTF film and adhesive powder, and a solid heat press. As you learn, you’ll also want to consider thin-to-medium fabrics and test swatches to calibrate color and texture. The goal is a low-frustration workflow that produces sharp, long-lasting designs suitable for t-shirts, tote bags, and other textiles while keeping the process approachable for beginners.
The DTF Transfer Process: From Design to Finished Garment
The DTF transfer process is a step-by-step journey from artwork to wearable print. It begins with preparing your design, then printing onto a transfer film, followed by applying adhesive powder, curing, and finally transferring with a heat press. Each stage is critical for achieving vibrant color, edge sharpness, and durability across a range of fabrics. Understanding this flow helps you troubleshoot more effectively and speeds up your production over time.
A key advantage of direct-to-film transfer is its versatility across materials, from cotton and polyester blends to some synthetics. By mastering the dtf transfer process, you can produce high-quality designs with a wide range of garment types and maintain consistent results. This makes DTF a practical option for small runs, custom orders, and personal projects alike.
How to Do DTF Printing: A Step-by-Step Beginner Guide
How to do DTF printing starts with designing and preparing your artwork for print. Use vector art or high-resolution raster images, ensure proper color separation, and mirror designs as needed for transfer. Then print onto DTF film using the appropriate settings for your inks, aligning print parameters with your chosen DTF workflow. For beginners, keeping the steps simple and repeatable minimizes surprises and helps you build confidence.
Next comes the powder, cure, and transfer: after printing, you apply adhesive powder, cure it according to your materials, prepare the fabric, align the transfer, and press with the correct temperature, time, and pressure. A practical tip is to perform test transfers on similar fabrics to fine-tune color, placement, and texture before committing to a larger batch.
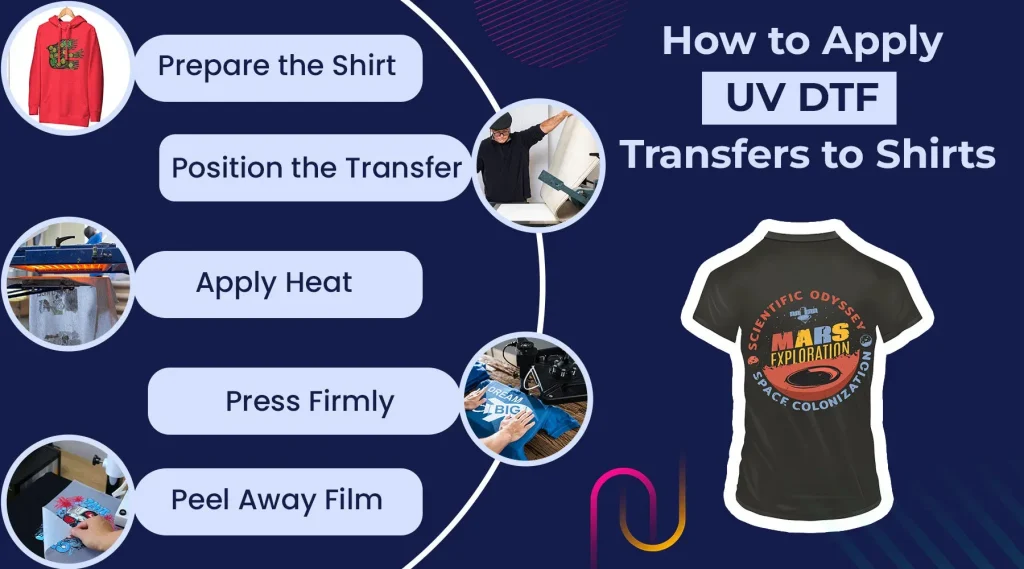
UV DTF Transfer: Enhancing Color and Durability in Direct-to-Film
UV DTF transfer introduces UV-curable inks or curing steps at key points in the process to achieve brighter colors and potentially faster handling. This variant of direct-to-film printing can improve edge sharpness and color stability in certain lighting environments, making it appealing for projects with high color fidelity requirements. For beginners curious about advanced capabilities, UV DTF transfer offers opportunities to experiment with unique effects while staying within the broader DTF family.
In practice, integrating UV curing into the workflow means balancing curing times, ink properties, and fabric compatibility. While UV DTF transfer can streamline some steps, it also adds complexity that may require extra safety considerations and precise equipment, such as a UV lamp or UV-curable ink line. The core principles—print on film, apply powder, cure, and press—remain intact, with UV curing acting as an optional enhancement rather than a mandatory step for every project.
Equipment, Materials, and Setup for Direct-to-Film Transfer Success
A practical UV DTF transfer setup begins with a reliable printer and compatible inks, plus DTF film and adhesive powder. You’ll also need a heat press, a weighing scale for powder distribution, and basic cleaning supplies. The core goal is to establish a dependable, repeatable workflow for direct-to-film printing that yields consistent results across different fabrics and designs.
Budget considerations matter: beginners should start with entry-level but trustworthy components, and you can expand later as demand grows. Starter kits tailored for DTF printing often balance film, powders, and a modest printer setup to provide a solid foundation. As you gain experience, consider adding a dedicated curing stage, higher-capacity ink supplies, or a larger heat press to accommodate larger designs and more frequent runs.
Troubleshooting, Care, and Maintenance for High-Quality DTF Transfers
Even a solid DTF workflow can encounter issues like fading, peeling, or smears. Common causes include insufficient curing of adhesive powder, incorrect heat press temperature, or misalignment during transfer. By validating curing times and temperatures, ensuring clean film handling, and adjusting ink density, you can address these problems and maintain consistent transfer quality across batches.
Ongoing care and fabric maintenance are essential for durability. Turn garments inside out for washing, follow recommended wash temperatures, and avoid high-heat drying when possible. Regularly inspect prints for cracking or color loss and reprint as needed. With careful care and a solid maintenance routine, UV DTF transfer and direct-to-film printing projects can remain vibrant and durable through many washes and wears.
Frequently Asked Questions
What is UV DTF transfer and how does it relate to direct-to-film printing?
UV DTF transfer is a Direct-to-Film printing workflow that uses UV-curable inks or a UV curing step to boost brightness and durability on fabrics. In practice, you print your design onto PET film for direct-to-film transfer, apply adhesive powder, cure, and then press the image onto the fabric. This approach keeps the versatile fundamentals of direct-to-film printing while leveraging UV curing to enhance certain results.
Is UV DTF transfer suitable for beginners and how do I get started with DTF printing for beginners?
Yes, UV DTF transfer can be approachable for beginners. Start with the core direct-to-film printing setup: a printer capable of printing on PET film, DTF film and adhesive powder, and a heat press. You can add UV curing later as you gain experience—follow the fundamentals of DTF printing for beginners and test on similar fabrics before scaling.
What is the dtf transfer process when using UV-curable inks?
The dtf transfer process with UV-curable inks follows these steps: design, print onto DTF film, apply adhesive powder, cure the powder (using UV curing if your setup requires it), prepare the fabric, align the transfer, press with heat, and allow to cool. Using UV-curable inks or stages can speed handling and improve color stability in certain conditions.
How does UV DTF transfer differ from standard direct-to-film printing, and what are the key steps in the dtf transfer process?
UV DTF transfer differs by adding a UV-curing step or UV inks at one or more points in the dtf transfer process, which can improve edge sharpness and durability. The core steps remain: print on the DTF film, apply and cure adhesive powder, prep the fabric, align the transfer, and press. The UV component is leveraged when it fits your workflow and materials.
What are common issues with UV DTF transfer and how can I troubleshoot them?
Common issues include color fading or cracking (check curing temperatures and times, and ink density), peeling after washing (confirm adhesive bonding and proper cure), white halos from misalignment, and smearing from handling errors. Troubleshooting tips: ensure proper curing, verify heat press settings, perform test prints on similar fabrics, and keep films and platen clean between transfers.
What equipment and supplies do I need to start UV DTF transfer (direct-to-film transfer)?
Essential gear includes a printer capable of printing on PET film, either UV-curable inks or a UV cure stage, DTF film, adhesive powder, a heat press, a powder curing option, a weighing scale, squeegee, lint-free towels, cleaning supplies, and safety gear. This setup supports UV DTF transfer and the broader direct-to-film transfer workflow.
| Topic | Key Points | Notes |
|---|---|---|
| What is UV DTF transfer? |
|
Core workflow remains: print on PET film, apply powder, cure, and transfer with heat press; UV can be integrated at key points |
| Why choose UV DTF transfer for your projects? |
|
UV can enhance results in specific applications and lighting environments |
| What you need to get started with UV DTF transfer |
|
Begin with practical, budget-conscious options and expand later |
| Setup and learning curve |
|
Progress at your own pace; build your toolkit as you gain confidence |
| Step-by-step workflow overview |
|
For UV DTF, ensure UV-curable inks are properly cured as required |
| Tips and best practices for beginners |
|
Calibrate devices; test prints on similar fabrics to preview color accuracy |
| Common issues and troubleshooting |
|
Iterate and calibrate through testing transfers |
| Care, durability, and maintenance |
|
Durability depends on fabrics and care; ongoing maintenance improves longevity |
| Budget considerations and getting started wisely |
|
Introductory kits can offer value and reliability for beginners |
| Final thoughts |
|
The field is expansive; build a solid foundation to grow your skills |
Summary
UV DTF transfer is a versatile, approachable path for creating vibrant, durable prints on fabrics without the complexities of traditional screen printing. This guide summarizes the core workflow, equipment needs, and best practices to help you start with confidence. With careful setup and steady practice, you can produce professional-quality transfers across a range of textiles, while maintaining flexibility for small runs, white underbase options, and adaptable curing methods. As you gain experience, you’ll refine techniques to suit your favorite fabrics, inks, and heat-press settings, turning UV DTF transfer projects into reliable, repeatable successes.