UV DTF transfer is reshaping how beginners approach fabric and surface customization. This beginner-friendly guide explains the UV DTF printing workflow, from design considerations to the final transfer. You’ll follow the DTF transfer process step by step, including substrate prep, adhesive handling, curing, and quality checks. We cover DTF printer setup and practical color management, along with heat press techniques for DTF to help you dial in time, temperature, and pressure. Finally, the guide compares UV DTF transfer with other methods by outlining DTF vs sublimation considerations so you can choose the right approach for your project.
In other terms, this approach blends direct-to-film workflows with UV-curable elements to deliver vibrant graphics on a wide range of substrates. From an LSI perspective, you’ll encounter phrases like direct-to-film printing, UV-curable transfer media, and color-managed printing that point to the same core steps. This terminology helps beginners connect design, substrate prep, and heat application, regardless of the brand or equipment used. By focusing on underlying concepts rather than product names, you can build a flexible workflow you can adapt across garments, bags, and home decor.
Understanding UV DTF transfer: A Beginner’s Guide to DTF Printing
UV DTF transfer blends the flexibility of direct-to-film printing with the precision of UV-curing inks, enabling vibrant graphics on cotton, polyester blends, and other substrates. In UV DTF printing, designs are printed onto a clear transfer film using UV-curable inks, then laminated with adhesive and cured before transfer. The UV element can improve color stability and durability, depending on your system and inks.
For beginners, the main appeal is a relatively forgiving workflow that supports experimentation across fabrics and surfaces. With UV DTF transfer you can test on cotton tees, tote bags, or canvas without committing to a more complex dye-sub setup. A solid plan, a clean workspace, and a simple checklist help keep missteps small and learning fast.
DTF transfer process essentials: From design to adhesive powder
The DTF transfer process begins with design prep: choosing a color profile, organizing layers for printing (often including a white underbase on dark fabrics), and setting margins that account for transfer tolerance. Work in a color-managed environment and run test prints to verify color accuracy before committing to final runs.
Next comes the adhesive step and curing. After printing, you apply adhesive powder to the film, then cure or dry according to your ink system. This sequence is critical to ensure clean release from the film and strong adhesion to the substrate during the heat transfer.
Setting up your DTF printer: hardware, software, and DTF printer setup tips
Your DTF printer setup begins with selecting a printer capable of handling DTF transfer media and compatible with the inks you plan to use. If you already own a DTF printer, verify whether it supports UV-curable inks or a separate curing unit, and confirm media compatibility.
Next, gather dedicated DTF transfer films, adhesive powder, and a dependable heat source. Pair your hardware with suitable design software, RIP tools, and color management routines to drive consistent print results. Proper calibration and driver configurations are essential for predictable output across substrates.
Mastering heat press techniques for DTF: Time, temperature, and pressure
Time, temperature, and pressure choices greatly influence the final look of a DTF transfer. Mastering heat press techniques for DTF means dialing in these variables for each substrate. Start with a conservative temperature and dwell time, then adjust for cotton versus polyester blends to avoid scorching or dulling while maintaining ink bond.
Ensure even pressure across the platen, use a pre-press step to flatten the surface, and consider a brief post-press cure if your system benefits from it. Document your settings so you can reproduce reliable results and steadily improve transfer durability over multiple runs.
Substrate selection and finishing: From Cotton T-Shirts to Canvas with DTF transfer
Substrate selection and finishing begin with a clean, stable surface. Cotton, polyester blends, and canvas are common targets for DTF transfers, but always consult substrate guides for adhesion expectations. Pre-press the material to remove moisture and create a smooth, flat print area to optimize the transfer surface.
Finishing touches include testing on scraps from the same batch and applying any required post-transfer cure or coating per your ink system. This reduces curling and ghosting and helps ensure consistent results across batches, especially when you mix fabrics and textures.
DTF vs sublimation: choosing the right path for your projects
DTF vs sublimation highlights the key differences in workflow, substrate compatibility, and color handling. DTF printing lets you print directly to transfer films with white underbase options, enabling vibrant, full-color designs on a wide range of fabrics and surfaces. Sublimation, by contrast, works best on polymer-coated substrates and often requires different heat and color management considerations.
Choose DTF when you need vibrant full-color prints on cotton and blends with white ink capabilities, or when you want easy multi-substrate results. Opt for sublimation when your project uses polyester-focused substrates and you prioritize very soft hand feel and edge-to-edge coverage on coated materials. Each path has its own cost, workflow, and durability implications, so align your choice with your substrate library and end-use goals.
Frequently Asked Questions
What is UV DTF transfer and how does it differ from the DTF transfer process?
UV DTF transfer is a hybrid method that blends the flexibility of direct-to-film with UV curing to enhance color stability. In this workflow, you print onto a DTF transfer film, apply adhesive powder, cure or dry the print, and then transfer with heat and pressure to the substrate. The UV element can improve durability and vibrancy on a wider range of fabrics and surfaces, but ink compatibility and curing steps vary by system. For beginners, focus on substrate prep, proper curing, and consistent heat-press timing to avoid common mistakes.
What equipment do I need to begin with UV DTF printing, and how do I handle DTF printer setup?
Key gear includes a DTF capable printer with UV ink or curing options, DTF transfer films, adhesive powder, a heat press, compatible substrates, and basic design software. Check your DTF printer setup to confirm support for UV curing or UV inks and to verify driver settings. Also ensure a safe, well-ventilated workspace and keep the printer and films clean for reliable UV DTF transfer results.
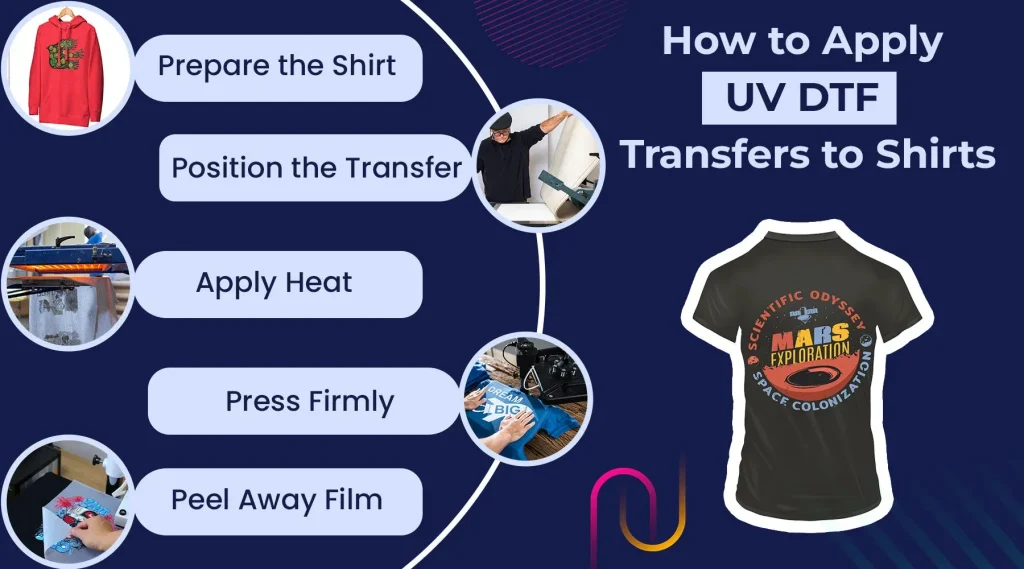
What are the essential steps in the UV DTF transfer workflow from design to heat press?
The essential steps are: 1) design with color management and a white underbase if needed; 2) print on the DTF transfer film using the UV system; 3) apply adhesive powder and let it set; 4) cure or dry to fix ink and powder; 5) remove excess powder; 6) transfer to the substrate with an even heat press; 7) peel and finish after cooling.
What heat press techniques for DTF work best with UV DTF transfer on different fabrics?
Use a pre-press to flatten the surface, then set your heat press to about 160–170°C (320–340°F) for 10–15 seconds with medium to firm pressure. Adjust time and pressure for different fabrics and textures, and ensure even pressure along seams. Always test on a scrap piece first and allow the design to cool before peeling for best results.
How does UV DTF printing compare to sublimation for beginners in the DTF vs sublimation context?
UV DTF printing offers color-rich transfers on a wider range of fabrics, including dark materials, and can incorporate white ink underbases, whereas sublimation requires polyester or coated substrates and cannot print white. For beginners, UV DTF transfer provides more versatility and easier handling of white and dark fabrics, but costs and equipment complexity vary. The choice depends on substrate, color management, and heat press technique.
What are common challenges with UV DTF transfer and how can I troubleshoot during DTF printer setup and printing?
Common issues include misalignment, color bleed, incomplete adhesion, ghosting, and cracking on curved areas. Troubleshoot by rechecking alignment with registration marks, ensuring accurate color profiles, verifying adhesive powder distribution and curing, pre-pressing the substrate, and testing on scraps to dial in heat and pressure for your substrates.
| Topic | Key Points |
|---|---|
| What is UV DTF transfer? |
|
| Why it matters for beginners |
|
| Core tools and equipment |
|
| Design and prepress |
|
| Printing workflow: step-by-step |
|
| Substrate prep and finishing |
|
| Troubleshooting |
|
| Best practices |
|
Summary
UV DTF transfer offers a practical, scalable path for beginners to explore fabric and surface customization. A structured workflow—covering the essential tools, design considerations, and a repeatable print-and-press process—helps you achieve reliable, vibrant transfers. Start small, validate each step, and gradually tackle more complex substrates and designs to build confidence. With patience and practice, UV DTF transfer becomes a repeatable routine for producing durable, high-quality prints.